Vegan Black Bean Brownies

What kind of brownie do you prefer? Cake like? Fudgy? Or something in between? I personally think a brownie should be as fudgy and gooey as possible. If that´s your kind of brownie too, continue reading!

Ever since black bean brownies became a thing I have wanted to love them. A dessert made with a superfood vegan protein source? Yes please! However, you should only call something a brownie if it actually tastes like a brownie and I always found that black bean “brownies” were not gooey, chocolatey or well – yummy enough to pass for brownies. So recently I made it my mission to change this. And the result is a healthy, guilt free, black bean brownie that tastes sinfully good and just like a brownie should!

I promise you that no-one will ever know that these are vegan, gluten-free and refined sugar free. Nor will they have the slightest clue that they are made with beans. Often, healthy baking can seem like a compromise on taste and texture but I promise you – there is absolutely no compromise made with these babies! They are pure brownie goodness!

The secret to the amazing texture of these brownies is the cashew butter. If you prefer, I am sure that you can substitute any other nut or seed butter of your liking. Also, if you like a bit more crunch in your brownies go “nuts” and add some walnuts, pecans, macadamia nuts or any other nut of your choice. They are quite versatile like that.


Vegan black bean brownies

Serves 8

INGREDIENTS

  • 1 1/2 cups unsalted black beans
  • 2 tablespoons flaxseed flour
  • 1/2 cup cashew milk
  • 1/3 cup cashew butter
  • 1/3 cup cacao
  • 1/2 cup maple syrup
  • 1/2 cup coconut sugar
  • 2 teaspoons vanilla extract
  • 1 teaspoon baking powder
  • 1/4 teaspoon salt
  • 1/2 cup chocolate chips

METHOD

  1. Preheat the oven to 180 degrees celcius (400 fahrenheit)
  2. Lightly grease a brownie pan
  3. In a small bowl, mix together the flaxseed flour and cashew milk. Set aside to thicken for 5 minutes
  4. Combine all ingredients aside from the chocolate chips (but including the flaxseed flour mixture) in a food processor and process until completely smooth. This takes a couple of minutes.
  5. Fold in the chocolate chips
  6. Pour brownie mixture into the prepared pan
  7. Bake for 40 minutes

NOTES

  1. As mentioned, feel free to substitute the cashew butter for any other nut butter of choice and/or add nuts
  2. Cooking time can vary a few minutes depending on your oven. Start checking on the brownie after about 35 minutes to make sure it doesn´t get over done. Remember – we like it fudgy!

I am so curious to hear what you think of these! Personally, I see no need to ever go back to refined flour and sugar brownies. It´s a new go-to in my recipe collection and I hope it will be in yours too!

Slow Cooker Apple Butter

It is my belief that almost anything and everything can be cooker in a slow cooker. Of course, this includes apple butter. Not only does it give you a velvety smooth and flavorful condiment – it is also guaranteed to make your entire house smell amazing! Imagine coming home on a cold rainy day to a house smelling of warm apples and fall spices. God yes! And oh yes – cooking really does not get any easier!

Apple butter is again one of those things that we don´t have or know in Denmark and I was therefore only introduced to it through – you guessed it – my American fiancé Lance. Admittedly, I was a bit skeptical to begin with. I imagined that apple butter could not be all that different from apple sauce, in which case why would anyone bother with the extra effort? After making this and having one single spoon lick (that quickly turned into several) I knew the difference instantly. Apple butter is so much thicker and velvetier than apple sauce. As I also added a few spices to mine,  it is also much more flavorful! Many apple butter recipes call for a ton of sugar, which I think is a real shame. Why take something as good and healthy as apples and ruin the flavor by overpowering it with zero-benefits refined sugar? That is why I only used dates and apple cider as sweetener in this recipe. And trust me – it is plenty sweet  – all while at the same time allowing the flavors of the apples and spices to shine through.

This stuff tastes amazing and is so versatile. From not having any idea what to do with apple butter before knowing what it was, I now cannot wait to add it to absolutely everything! I´m thinking apple butter oatmeal, lattes, chia puddings and even salad dressings! I also have an intense desire to go experimenting with some apple butter turnovers right this instant!

Anyways, before going to experiment with all the recipes that will require apple butter, I should first of all give you the actual apple butter recipe.


Slow cooker apple butter

Makes 2.5 cups 

INGREDIENTS

  • 1 kg apples (2.2 lbs)
  • 3/4 cup pitted dates
  • 1/2 cup apple cider
  • 2 tablespoons lemon juice
  • 1 1/2 teaspoon cinnamon
  • 1/4 teaspoon allspice
  • 1/4 teaspoon salt

METHOD

  1. Core and chop the apples. (I used an apple slicer which made this step very quick). Leave the skin on the apples. Not only does it save you some effort, it also gives you the most nutrient rich apple butter as most of the vitamins can be found in the peel
  2. Pour the apples into a slow cooker
  3. In a blender of foodprocessor combine dates, apple cider, lemon juice and spices. Process until smooth.
  4. Poor the blended dates over the apples in the slow cooker
  5. Slow cook on low for 10 hours, stirring once or twice in between to make sure the apples don´t burn on the bottom
  6. Once the apples are done slow cooking, pour the entire apple mixture into a blender or food processor. Process until smooth.
  7. Pour the apple butter back into the slow cooker. Now cook uncovered on high for an additional 2 hours. This will let some of the water evaporate and give you the thickest apple butter. Trust me. Don´t skip this step!
  8. Once done, pour into a jar and keep refrigerated for up to three weeks.

NOTES

  1. I recommend using a mix of sweet and tart apples for the most flavorful butter. The more varieties, the more flavor!
  2. Next time, I think I might make a double batch and freeze half. You can never have too much apple butter and this way you can have it ready in a snap when you run out.


As an apple butter newbie (yes, there is such a thing) I´m curious to hear what your favorite ways of using apple butter are. Let me know in the comments below!

Overnight Banana Oatmeal

One of the best things about being in a relationship is learning from each other. And I love how Lance taught me what a slow cooker is! 😉 Slow cookers are far from common in Denmark and I had therefore never heard about it before Lance introduced me to it – as one of many American things than I have since then fallen in love with. Now, I could never live without my Crockpot. (For non-Americans a Crockpot is simply a slow cooker brand. And the best bran in my opinion). In fall and winter in particular, hardly one day goes by where I don´t use it.

One of my favorite ways to use the slow cooker is for overnight oats. How great is it that you get to wake up to a wonderfully smelling home, not having to spend time on preparing breakfast? I love how this allows me to go to the gym and come home and have a quick breakfast before going to work. It is such a timesaver! We don’t have kids yet but I can only imagine how convenient this must be for families with young kids as well. When you´re busy trying to get everyone up and dressed, how great is it that you don´t need to worry about finding time to prepare breakfast as well? At least if you want to serve your family a nutritious meal and not just grab for the sugary cereal box…

The key to making overnight oatmeal in the slow cooker is to use steel cut oats. This is because they require longer cooking time. Rolled oats cook way too quickly and are therefore not great for the slow cooker. Another benefit of using steel cut oats is that they take longer to digest because they are less processed. This in turn helps keep you full longer. Win!

If you have tried other overnight oatmeal recipes, you will notice that my recipe calls for more liquid than most others. I find that the oats absorb the liquid really well, and extra liquid means extra quantity. I don’t know about you, but I like getting a bigger portion without getting extra calories 😉 Of course, everyone likes their oatmeal texture a bit differently so feel free to add a bit less water if you prefer your oatmeal extra thick. (I find this version to be plenty thick though. It is far from runny.)


Overnight banana oatmeal

SERVES 2  

INGREDIENTS

  • 1/2 cup steel cut oats
  • 2 cups water
  • 1 cup almond milk
  • 1 banana – mashed
  • 1/2 teaspoon salt
  • 1 teaspoon cinnamon
  • Your choice of toppings (I used blueberries, cashew butter and hemp seeds)

METHOD

  1. Combine all ingredients in a slow cooker
  2. Cook on low for 9 hours
  3. Serve with your choice of toppings

NOTES

  1. This recipe is so versatile. Feel free to add or exchange any fruits that you like. The possibilities are endless!
  2. If you are worried about the oatmeal burning, here´s one of the best slow cooker tips I´ve ever learned: pour a bit of water in the slow cooker. You then put the oatmeal ingredients in an oven safe bowl and place the bowl in the slow cooker. The water should go about half way up the side of the bowl. You then cook the oatmeal for 9 hours like normally. Perfect. Every time.

What´s your favorite oatmeal flavors? I´m curious to know! I tend to stick to the same variations over and over again so I would love some new inspiration 🙂

Pumpkin Apple Pancakes

Before I started dating Lance 10 years ago, I had never in my life had American pancakes before. Can you believe that!? In Denmark, pancakes normally refer to crêpes, which is usually a dessert and not a breakfast. Although of course I had to create a breakfast crêpe version as well. You can find my recipe for banana oat crêpes right here: https://www.sweetpotatoesandsunshine.com/2017/08/06/easy-peasy-banana-oat-crepes/

Anyways, 10 years later, I wonder how it was even possible to live 20 years of my life without this number one weekend breakfast treat! We have pancakes at least every other weekend. Weekends are for hygge (Danish word for coziness) and that means that breakfast should be a step-up from the rushed breakfasts that we have on weekdays. The answer: Pancakes.

Of course there are about a million different pancake recipes out there – and you will certainly also be able to find more variations on this blog in the future – but I have to say that this pumpkin apple version ranks at the top of my favorites. Pumpkin and apple is the perfect fall combination and it makes for a very flavorful pancake! They taste so good that I will often eat them by themselves without bothering with toppings. No joke.

They come together quite quickly and with their high vitamin content and no refined sugars, they are an excellent way to start the day. Guilt free. Kids, adults and dogs have tasted these in our home and it seems to be a winner with all. 😉


PUMPKIN APPLE Pancakes

SERVES 2 (Makes 8 pancakes) 

INGREDIENTS

  • 1 cup oats
  • 1 teaspoon baking powder
  • 1/4 teaspoon salt
  • 1 teaspoon cinnamon
  • 1 teaspoon vanilla extract
  • 2 tablespoons maple syrup
  • 1/2 cup pumpkin pure (fresh or canned)
  • 1/2 cup greek yogurt (or skyr or quark)
  • 2 eggs
  • 1 apple (I prefer using a tart variation)
  • Coconut oil for baking
  • Toppings of your choice (I like this version with greek yogurt, blueberries, apples and maple syrup)

METHOD

  1. Grind the oats into a fine flour in a food processor
  2. Add all other ingredients, except for the apple, and process until well combined
  3. Shred the apple and fold it into the batter
  4. Grease a pan lightly with coconut oil and and bake pancakes at medium low heat
  5. Serve immediately with your preferred toppings

NOTES

  1. Resist the temptation to bake the pancakes at a higher temperature. The batter is rather wet, so the pancakes need to be cooked at a fairly low temperature to ensure they get done all the way through.
  2. I often make a double batch and freeze half for lazy weekends where I don´t have time or energy to be early in the kitchen.

Let me know how you like them! If you are vegan please note that I will be working on creating a vegan version of these babies as well. Stay tuned for it.

Pumpkin Apple Oatmeal with Ginger and Turmeric

We´re now almost halfway through October and I have to admit that the weather isn´t very fall-like here in Switzerland. 20C degrees and lots of sun means I´ve barely had to wear a jacket yet! It also means that the weather isn´t exactly screaming warming comfort food but nevertheless oatmeal remains my favorite breakfast. And when it includes both pumpkin and apple even more so! I just love that combination (as you´ll be able to tell from the next blog posts I have lined up as well).

Oatmeal just has it all – it´s healthy, it´s delicious, it´s filling and it´s quick to prepare. I also love how there are endless possible variations. When I´m in the kitchen I (almost) always keep in mind what´s good for my body. Which means trying to make my meals as nutrient dense as possible. This particular variation of oatmeal definitely fits that bill. For example, did you know that half a cup of pumpkin (as used in this recipe) contains over 300% of your daily vitamin A requirements? And almost 25% of your vitamin K requirements? Not to mention the ton of vitamin C you´ll get from the apple in there and the gingerol from the ginger which is packed with anti-inflammatory and antioxidant effects. I could go on for quite a while about the health benefits of this hearty and soul warming breakfast but to keep this blog post relatively short, let´s just leave it at it´s really really good for you! 😉


Pumpkin Apple Oatmeal with ginger and turmeric


SERVES 1

INGREDIENTS

  • 1/3 cup rolled oats
  • 1/2 cup almond milk
  • 1/2 cup water
  • 1/4 teaspoon salt
  • 1/2 cup pumpkin puree (canned or fresh)
  • 1/2 teaspoon cinnamon
  • 1/4 teaspoon ground turmeric
  • 1/2 teaspoon fresh finely grated ginger
  • Toppings as desired (I used almonds, hemp seeds, goji berries and a drizzle of honey)

METHOD

  1. Combine oats, almond milk, water and salt in a medium size pot and cook over medium heat until the oatmeal has a consistency only a bit thinner than you like – about 10 minutes.
  2. Add the pumpkin puree and continue cooking a couple of minutes more until the oatmeal has your desired consistency and is heated all the way through
  3. Take off stove and stir in cinnamon, turmeric and ginger
  4. Serve immediately with your choice of toppings

NOTES

  1. Feel free to add more/less turmeric and ginger to suit your taste
  2. You can also use fresh turmeric instead of ground (use 1/2 teaspoon fresh) and/or ground ginger instead of fresh (use 1/4 teaspoon ground). Normally I prefer to use fresh ingredients but I didn’t have any fresh turmeric on hand today.

I hope you guys enjoy this breakfast as much as I did. Thanks for being patient with me as I´m learning how to blog. I promise I´ll develop as I keep practicing 😉 Any tips and advice is well received!

Vegan Banana Bread

I am currently reading Whole: Rethinking the Science of Nutrition by T. Colin Campbell (also the author of The China Study). Mr. Campbell advocates for a plant based diet, and reading his highly researched and fact based argumentations, it is hard not to want to go fully vegan / plant based in an instant. Although I am not vegan, or even close to being it, I do aspire to work myself towards a more plant-based diet as I fully believe this to be the healthiest. On top of that, it also means being good to animals and the environment so really, what is the excuse?

Well, in any case… On my path to transitioning to a more plant based diet, I recently came up with this delicious banana bread. I was actually just playing around in the kitchen, thinking that I needed to use the brown bananas I had had sitting on my countertop for almost a week. I didn’t expect anything extraordinary to come out of it, but oh my was I pleasantly surprised! Let me tell you all: this banana bread is a winner! Said in all modesty, the consistency of this bread is perfect: super moist but without being the least bit underdone or soggy. On top of that, it´s healthy and fairly low calorie. No refined sugars, no oil, no gluten and only 124 calories per slice. And oh yes, let´s not forget the fact that it tastes exactly as banana bread should. Full of banana flavor and just the right level of sweetness. I really can´t think of any reasons why you should not go make this bread right this instant! 

Be ready to have your house smelling heavenly! Here goes:

Vegan Banana Bread

Serves 12

INGREDIENTS

  • 2 tablespoons flaxseed flour
  • 1/2 cup almond milk
  • 1 cup green banana flour (or substitute 1 1/4 cup all purpose flour)
  • 1 teaspoon baking powder
  • 1 teaspoon baking soda
  • 1 teaspoon cinnamon
  • 1 1/3 cup mashed bananas (about 3 large bananas)
  • 1/4 cup coconut sugar
  • 1/3 cup unsweetened apple sauce
  • 2 teaspoons vanilla extract
  • 1/3 cup chopped walnuts (optional)

METHOD

    1. Preheat the oven to 175 degrees celcius and grease a loaf pan
    2. Combined the flaxseed flour and almond milk and set aside
    3. In a small sized bowl, combine all dry ingredients (banana flour, baking powder, baking soda, and cinnamon)
    4. In a medium sized bowl, combine all the wet ingredients (mashed bananas, coconut sugar, apple sauce and vanilla extract)
    5. Slowly mix the dry ingredients into the wet ingredients, being careful not to overstir
    6. Fold in chopped walnuts, if using
    7. Bake on the middle oven rack for about 40 minutes

NOTES

    1. Everyone likes their banana bread a little differently so feel free to adapt the recipe to your own liking by adding different nuts, raisins or chocolate chips!
    2. My loaf was done perfectly at exactly 40 minutes, but check on it after 35 minutes as each oven is a bit different
    3. It is best served warm so I recommend reheating leftovers – that is if there are any! 😉

Go ahead and try to stick to just having one piece. I dare you! 🙂

Lentil & Shrimp Salad

Until I moved away from home and started eating for health around 10 years ago, I never even knew about lentils. Given that lentils are tasty, filling and a nutrient superstar, it has now become a staple in my diet. Lentils are packed with fiber, protein, minerals and vitamins. They are fairly low in calories (230 calories per cup cooked) and contain almost no fat. I love eating foods that I know are good for my body and even better is when the meal keeps me full for hours, like this  salad.

This salad has it all. It´s filling, it´s tasty and it´s pretty. It sounds silly to say that it looks pretty, but we all eat with our eyes and just look at all those beautiful colors! Doesn’t´t that make you happy? For a healthy and complete diet that covers all your nutrient needs, a good advice is to eat food of all colors of the rain bow. This salad covers most of them!

It works perfectly for both lunch and dinner – in particular when the weather is hot like at the moment. If you are vegan or have shellfish allergies, the salad is also great with tofu as a substitution. Of course, you could also just leave it out completely!

Lentil & Shrimp Salad

Serves 8

Ingredients

  • 1 cup dry lentils
  • 100g arugula
  • 1/2 cucumber
  • 5 green onions
  • 1 red bell pepper
  • 1 yellow bell pepper
  • 1 mango
  • 1 cup edamame beans (no shells)
  • 1 cup pomegranate seeds
  • 800g shrimps
  • 3 cloves garlic
  • 1 spicy red pepper

METHOD

Rinse the lentils and boil with a bit of boullion according to the package instructions.

While the lentils are cooking, rinse the arugula and chop the cucumber, green onions, bell peppers and mango.

Combine the arugula, chopped vegetables, edamame beans and pomegranate seeds in a large salad bowl.

When the lentils are done cooking – be careful not to overcook them so they become mushy! – strain any excess water and leave the lentils to cool a bit.

Finely chop the garlic and red pepper.

In a large pan, cook the shrimps. When the shrimps are done cooking, strain any excess liquids from the pan. Add the garlic and pepper to the shrimps and continue cooking for a couple of minutes.

Remove the shrimps from the heat and add both the shrimps and the lentils to the other salad ingredients in the salad bowl.

Toss and serve!

NOTES

The salad can be served either warm or cold. I´m not even sure which I prefer as both are delicious! Normally I have it warm for dinner and have cold leftovers for lunch the next day.

Let me know how you like it!


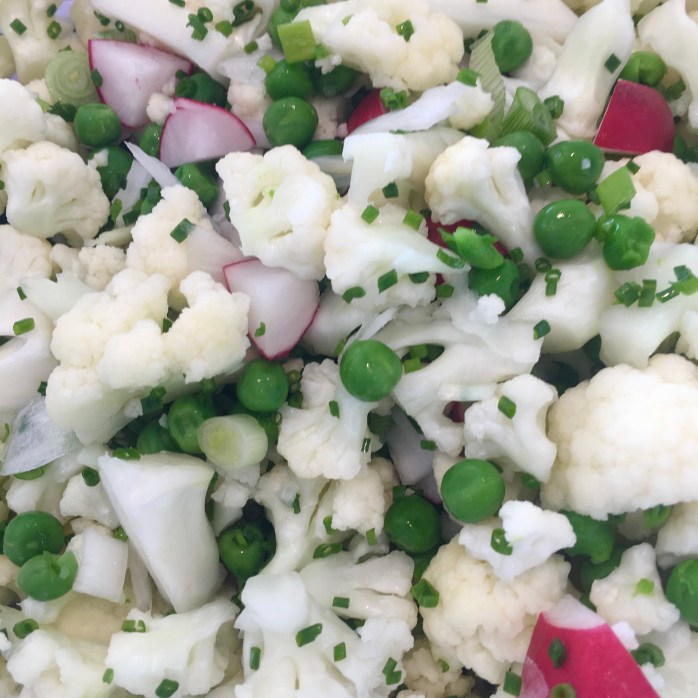
Cauliflower “Potato” Salad

In Denmark, we eat a lot of potatoes. And I mean a lot! In fact, the average Dane eats about 40 kg potatoes per year. I wonder if any other nations comes close to that? It basically means having potatoes with a meal every single day, year round. Thinking of it, I wonder how I never grew tired of eating all those potatoes when growing up. I guess it might be because potatoes are typically served with a cream based sauce in Denmark and I love sauces. I might have been known to try to get away with eating it like soup as a child. 😉

These days, I almost never eat white potatoes anymore. As you might have guessed from the title of my blog I absolutely LOVE sweet potatoes so most times I´ll substitute them for their white counterparts. However, that doesn’t´t work so well for a classic potato salad. What DOES work well as a substitution is cauliflower.

Classic potato salad is perfect for a summer barbecue but it is also a quite heavy side dish that can sometimes feel a bit much in the heat. On top of that, it is not exactly low calorie nor nutrient dense. That is why I came up with this version using cauliflower for a lighter, lower calorie option. The cauliflower substitutes the potatoes and quark substitutes mayo. On top of that, I have included peas, radishes and micro greens for a more nutrient rich dish. The salad goes excellent with any kind of protein (fish, poultry, meat) but can also very much be enjoyed on its own. And at about 100 calories per serving you can basically indulge guilt free and eat to your heart´s content!

Cauliflower “potato” salad

Serves 6
INGREDIENTS

  • 1 large head cauliflower
  • 1 cup peas
  • 1 cup radishes
  • 3 green onions
  • 1 cup micro greens (optional)
  • 1/4 cup chives
  • 1 cup quark (or greek yogurt or skyr)
  • 2 teaspoons mustard
  • 2 teaspoons applecider vinegar
  • 1 clove garlic
  • 1/2 teaspoon salt
  • 1/4 teaspoon pepper
  • 1/2 teaspoon onion powder

METHOD
Rinse the cauliflower and chop it into bite sized bits. Steam the cauliflower for just 3-4 minutes. You  will want it to still have a bit of crunch to it.

When the cauliflower is done, add it to a bowl together with the peas, chopped radishes, chopped green onions, microgreens and finely chopped chives.

In a separate bowl, combine the remaining ingredients to make the sauce. Add the sauce to the cauliflower mixture and toss.

NOTES

The salad can be served immediately, but I recommend putting it in the fridge for about half an hour to develop further flavor and to be served cold.

I developed this recipe a while back, but since it´s 30 degrees outside today and I have a head of cauliflower in the fridge that needs to be used, I´m thinking I might make this tonight. Given how low calorie it is, it might even leave room for ice cream for dessert. After all, it is Friday! 😉

Koldskål – A Danish Summer Speciality

As a Dane, there is no summer without koldskål and no koldskål without summer!

Having lived abroad for most of my life, I have always been fascinated with the cultural differences when it comes to food. Here in Switzerland, local dishes are dominated by the use of cheese in for example raclette, rösti and cheese fondue – dishes that people eat frequently but that you would never find outside of Switzerland. Similarly, Lance, my American fiancé could not believe that I had never in my life had pumpkin pie before we started dating. Given how much I love pumpkin pie now, I cannot believe myself either how I could possibly miss out on this for the first 20 years of my life!

From a Danish perspective, there are also several dishes/foods that you wonder how other people get by without. Proper dark bread, Danish pastries (trust me – what they sell in other countries marked as “Danish Pastries” is nothing like the real thing!) and koldskål, just to name a few.

So what exactly is koldskål? I think the closest I can describe it is a cold sweet soup with a lemon vanilla flavor. It can be eaten as dessert, but us Danes like to eat it at anytime during the summer. Be it for breakfast, dinner, dessert or a snack in between meals! It is normally served with strawberries and kammerjunkere, which Lance claims taste exactly like Nilla Wafers. As I´ve never had Nilla wafers myself I can´t vouch for this but they are small compact and crunchy cookies that are only very lightly sweetened. Combined with the lemon vanilla flavor of the koldskål, this makes the dish refreshing rather than sweet. Which is why it can be enjoyed at anytime of the day! 🙂

Vegan koldskål

Serves 4

INGREDIENTS

  • 400g silken tofu
  • 1 cup milk of choice (I used cashew milk)
  • 10 tablespoons freshly squeezed lemon juice (2 lemons)
  • 4 teaspoons finely grated lemon peel
  • 1/2 teaspoon pure vanilla
  • 1/4  cup granulated sweetener of choice (I used Xylitol)
  • Top with strawberries and kammerjunkere


METHOD
Grate and squeeze the lemons so that you have the lemon zest and lemon juice ready to go.

Add all other ingredients to a blender and process until smooth. Gradually add the lemon juice and lemon peel until it has the desired taste. I like mine with a rather strong lemon taste for it to be more refreshing, so you may want to use less than what the recipe calls for here.

Pour into bowls and serve cold with strawberries and kammerjunkere.
NOTES

Koldskål is meant to be refreshing on a hot summer day. It is therefore best enjoyed very cold! If your ingredients aren´t cold when you blend them, put the koldskål in the fridge for half an hour before serving.

As mentioned, everyone likes their koldskål a little different. Experiment with the amount of lemon and vanilla you use until you find the level that is right for you.

I´m sure you´re wondering where the recipe for kammerjunkere is. I haven´t created this yet, but am working on it. Until the recipe is ready to be posted on the blog, serve either with just strawberries or with strawberries and Nilla Wafers.

What´s your favorite national dish? I can´t wait to hear!

Vegan Chocolate Mousse

Normally, I am not the biggest fan of chocolate mousse. Made with sugar and cream, it feels extremely heavy and leaves me feeling physically uncomfortable. Especially if it is served as dessert after an already large and indulging meal. Does anyone else feel that way?

HOWEVER, after creating this much lighter, much healthier version of chocolate mousse, I have a newfound love for this decadent dessert. Unlike the traditional version, it actually satisfies that sweet tooth without making your blood sugar levels go on a rollercoaster ride. On top of that, it can be prepared in advance which makes it the perfect dessert if you are having guests over. You can actually spend time with your guests rather than feeling stressed in the kitchen, worrying about the mess you are creating as you try to whip up a Michelin masterpiece last minute. Or am I the only one who does that???

The secret to this mousse being so light and airy is the use of silken tofu instead of cream. This makes the dessert suitable for vegans as well as everyone else! If the thought of baking with tofu is unfamiliar to you, please don´t let this scare you off. I promise you that no one will ever be able to tell what it is made from!

It is light, healthy, decadent and takes less than 10 minutes to prepare. What is not to love?

Vegan Chocolate mousse


ServeS 3 

INGREDIENTS

  • 400g silken tofu
  • 80g dark chocolate (I used 92%)
  • 2 tablespoons cacao powder
  • 2 tablespoons date syrup (or other sweetener of choice)
  • 1 teaspoon vanilla extract
  • Berries and chocolate shavings for toppings

METHOD
Melt the dark chocolate in a water bath.

Add the melted chocolate and all other ingredients into a food processor or blender and process until smooth.

Pour into separate ramekins and put in the fridge to firm up for a minimum of 30 minutes.

Serve with your toppings of choice. I found the combination of strawberries, blueberries and chocolate shavings to be very refreshing!

VARIATIONS

  1. For an even more refreshing mousse, try adding 1 tablespoon of orange juice and 1 tablespoon of orange zest.
  2. For a richer mousse, try adding 1 tablespoon of Baileys or 1 tablespoon of coffee.

NOTES

If you are pressured for time, the mousse can be served immediately after blending the ingredients together. However, it is best if you have time to leave it in the fridge for a minimum of 30 minutes to firm up a bit. You can also leave it in the fridge overnight. A bit of liquid might form on the top of the mousse, but simply stir the ramekins using a teaspoon before serving.

Please let me know if you try this! I am curious to hear if I am the only one who likes this much better than traditional chocolate mousse! I´m also curios to hear which variation you prefer. I couldn’t´t quite decide myself…